I shared a post recently about pruning my trees and I shared that I bought a reciprocating saw and was using that to prune the larger branches on the fruit trees.
 I started pruning my BIG tree in the backyard that has our tire swing on it. I was using the saw blade that came with the saw.
 While cutting the first big branch, the blade broke. I went to the local hardware store and was going to purchase a blade that cuts wood and nails. There is an entire section of blades and lots of blades that can cut metal, wood and nails or just wood.

I was going to buy the wood one and a worker came and asked if he could help me. I told him I was pruning and he showed me two different blades made just for cutting trees.
I was so HAPPY about that as the other blades get hot and the tree smokes due to the friction and moisture in the branches.
 There was a long blade and a longer blade. I was worried about having such a long blade on the saw while climbing up an extension ladder so I decided on the shorter blade and then got a smaller general purpose one.
I was so HAPPY that the worker came and asked if I needed help.
I have a HUGE job in front of me to get the tree pruned and that little blade was taking forever.

I borrowed my neighbors extension ladder and started pruning and it was SO much quicker.
The reason I need to prune the tree is that it is hanging over the house and this tree has broken off huge branches three different times.
The tree lost the branches during storms at different times. Here is a post about that last one.
 Because of the branches falling, the tree is hugely lopsided. The branches were lost on three of the four sides and the fourth side just happens to be over the house.
About 14 years ago, when one of the bigger sections fell, it took out part of the fence and we hired a company to prune the entire tree. I always prune the lower branches but not the higher branches.
Because of the branches falling, the tree is hugely lopsided. The branches were lost on three of the four sides and the fourth side just happens to be over the house.
About 14 years ago, when one of the bigger sections fell, it took out part of the fence and we hired a company to prune the entire tree. I always prune the lower branches but not the higher branches.
 Because of this, the taller larger branches are now over hanging the fence and the house.
With that one side being so large, if it falls, I think it would do some damage..
Because of this, the taller larger branches are now over hanging the fence and the house.
With that one side being so large, if it falls, I think it would do some damage..
 While I was up there pruning, I saw that the rope for the tire swing has grown into the tree and the tree branch has grown around it and I then realized why I felt so strongly that I needed to get that tree pruned.
If you look closely, in these pictures, you can see that the section of rope nearest the trunk (there are five wraps around the branch) is almost not visible as the tree has grown around it.
While I was up there pruning, I saw that the rope for the tire swing has grown into the tree and the tree branch has grown around it and I then realized why I felt so strongly that I needed to get that tree pruned.
If you look closely, in these pictures, you can see that the section of rope nearest the trunk (there are five wraps around the branch) is almost not visible as the tree has grown around it.
 At some point, that will have cut off and weakened the tree branch at that point and if someone heavy were on the tree swing, it could have brought the branch down on them. Or, the branch could come down and hit the house.
The swing was put up about 7 years ago but I never thought about the rope hurting the tree. I am so grateful that I felt so strongly about pruning it this year. I have never gotten on a ladder and pruned it before so there must have been something urging me to do it. Here is a post about our tire swing.
At some point, that will have cut off and weakened the tree branch at that point and if someone heavy were on the tree swing, it could have brought the branch down on them. Or, the branch could come down and hit the house.
The swing was put up about 7 years ago but I never thought about the rope hurting the tree. I am so grateful that I felt so strongly about pruning it this year. I have never gotten on a ladder and pruned it before so there must have been something urging me to do it. Here is a post about our tire swing.
 Another reason it needed pruning is that the gutters on the house get full of leaves and take lots of cleaning each year and I also have a small cherry tree that I am trying to get to grow that you can see in fifth picture from the top and the branches have grown out so much that they are keeping it from getting sunlight so I am going to do a big prune this year. Hopefully, I won't have any branches falling and the pruning will help the gutters stay clearer.

I intend to put up a new tire swing after pruning the tree and am pondering on the best way to do that so that the tree doesn't have any trauma from it.
We are getting quite the wood pile from all the pruning I have been doing on my yard and helping friends. Just today, Princess Five and I helped my elderly neighbor get the shrubs pruned that were overtaking her sidewalk to the door.

She was very grateful and I was glad Princess and I had an opportunity to do service. By the end of the week, we should have a larger wood pile and perhaps we will use our wood stoves more next year with all that wood.
I have a VERY expensive leather sofa couch in my front room. It is leather and has feathers in the tops of the cushions making it ultra soft. I have a thing for feathers as I have down comforters on most of our beds and have "feather beds" on top of the mattresses under the sheets.
 I have feather pillows on my bed and feather decorative pillows as well. I LOVE sleeping in a "cloud" as my daughter calls my bed.
So, when I found this couch that was wide and the girls and I could cuddle while watching a movie, and it had feathers, I knew it was for us.
 I purchased the couch for my basement after it flooded a few years back. Click here to read about that.
One problem, it didn't fit down the stairs and into the family room! I paid a guy and we tried for hours to twist and turn and flip it all sorts of ways as the couch we had down there was about the same size. Difference was, the other couch had less of an angle and a shorter back in places.
I purchased the couch for my basement after it flooded a few years back. Click here to read about that.
One problem, it didn't fit down the stairs and into the family room! I paid a guy and we tried for hours to twist and turn and flip it all sorts of ways as the couch we had down there was about the same size. Difference was, the other couch had less of an angle and a shorter back in places.

So, what to do??? It didn't fit in the other area where we have a couch near the banister so the only spot I had for it was the front room. I had a black couch in there at the time and decided to move it near the banister and put the couch in the front room and get rid of the couch we had by the banister.

Well, this leather couch was to go with the more western area in the house which my front room isn't. Also, I have sun in that room all day. So, when the couch color started fading, I was worried.
There isn't a place for it other than where it is. It is expensive but in the five or so years I have owned it, it has faded to a point where I am worried it will crack.
 With that, I went to the "boot" store and shoe repair shop in town. I asked the owner what he would use to repair the fading on the couch. I asked if shoe polish would work and darken the color back to original and then maybe a conditioner to protect it from the sun.
 He told me he would worry about matching the color with the polish and that this product he has that conditions leather would darken the leather and perhaps bring back some of the dye color in the couch.
The product is called "Lexol" and has tannins in it. It also conditions the leather so it doesn't crack etc. It does say it will probably darken the leather and to "test" it somewhere not so noticeable.
 The owner also told me to use a "spray" bottle to get a fine mist on the leather. I asked about putting it on a cloth and wiping it on and he said it would take lots to do it that way as it gets heavy on one spot and none on after a little wipe.
I took his advice and put it in a spray bottle but the fumes were getting to me and my nose was running so I tried pouring it on the cloth and it really didn't work well.
The owner also told me to use a "spray" bottle to get a fine mist on the leather. I asked about putting it on a cloth and wiping it on and he said it would take lots to do it that way as it gets heavy on one spot and none on after a little wipe.
I took his advice and put it in a spray bottle but the fumes were getting to me and my nose was running so I tried pouring it on the cloth and it really didn't work well.
 If you were doing boots, it would be fine on a small area but he was right about spraying it on. My problem was that the sprayer I used did a circular pattern in its spraying as you can see by the pattern on the cushion which just meant I had to spray it more and rub it more.
The product was easy to use and I just sprayed and rubbed for a few minutes after letting it soak in for a few seconds. It dries and the dark water look fades and leaves a nice sheen and color.
 I will suggest you use gloves as I could taste the chemicals in my mouth after just a few seconds and put a glove on after that cushion. I could also taste it when I leaned on it with my bare arm as well when I was doing the back of the couch so take care and do it when it is well vented and wear gloves. As you can see, for the $10 investment, my couch looks so much better. It was an easy way to recondition the leather and save it from ripping and bleaching hopefully.
I am going to buy another bottle and redo it in two weeks after the conditioner has time to sink in and then I will coat it again every so often and hopefully get a few more years out of this couch.
 I just searched online for a better price and you can get it online for quite cheap for the larger bottle. Walmart online sells it and a smaller bottle at the store so I am going to see if I can get it shipped to the store and avoid shipping costs. Well worth the money and it gets "five stars" or every site I look on to purchase it!
Prince number one LOVES this couch and has "called" it when I get rid of it as it is long enough for him to stretch out for naps and reading when he visits. I need to keep it in good shape so they can inherit it someday. :-)
Oh, one more thing. It does leather car seats, saddles, shoes, chairs, etc as well. Just thought you may need to fix up an old saddle sometime. ;-)
Doesn't it almost look like new!?!
Years ago, my sister found this great idea and shared it with me. She made pumpkin carvings of her family and took a picture outside with all her kids faces on pumpkins.

I figured I would try it the next year and here are some we did in 2006. You can see Princess Four and Five here on pumpkins and I know we have done all the girls at some point but I don't think the pictures were digital and I haven't scanned all their photos in or put them in albums so I am not going to find those anytime soon with all I have going on so I was just happy to scan and find these cute pics of them so young and cute.
 You can tell it is them on the pumpkins and if I showed you the pictures we used, they actually are very close to the pictures as Princess Five had pony tails in her picture.
Anyway, I thought I would share with you how you can make any picture into a pumpkin or any melon for that matter. It would be cute to do with a watermelon for a baby shower or something also.
You can tell it is them on the pumpkins and if I showed you the pictures we used, they actually are very close to the pictures as Princess Five had pony tails in her picture.
Anyway, I thought I would share with you how you can make any picture into a pumpkin or any melon for that matter. It would be cute to do with a watermelon for a baby shower or something also.
 You take a photo you like. It can't be a small picture with lots of detail or it won't work as you have to leave connections to the outside of the picture in dark colors so things like the eyes will still be attached so a picture with contrast is great.
 Princess Five was a Zombie this weekend for a charity fun run where they had Zombies walking around scaring the runners. Personally, I can't think of a more terrible place to scare someone than when they are already running on a nature trail in the hills but I guess there are those that thought it would be a good idea so she and her friend volunteered.
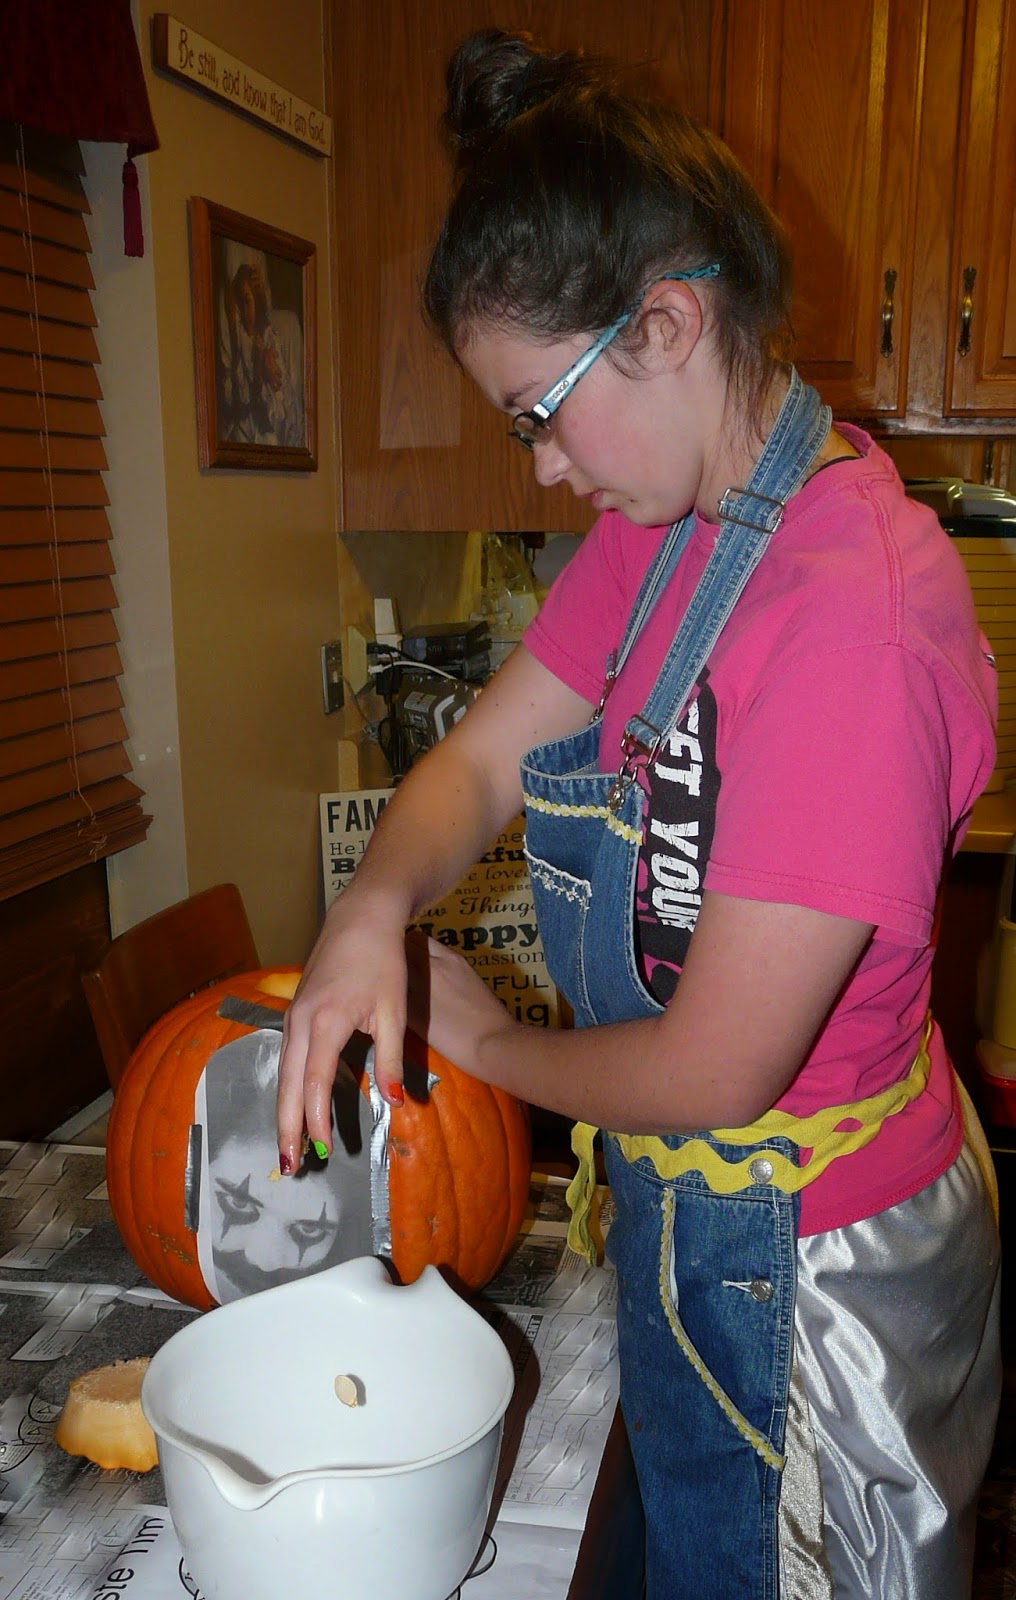
They took some cute pictures and she thought that carving her scary zombie face on a pumpkin for Halloween would be fun. We grew a few pumpkins this year and one was flat on one side which is PERFECT for carving these as you tape the picture onto the pumpkin for carving.
If you want to make it easier, pick one that does have a flatter side, it just makes it easier to carve.

Once you have chosen a picture, you want it to be about an 8x10 size or if you have a smaller pumpkin, 5x7 is good. What you do is photo copy or print the picture in black and white. You want to see the light vs dark contrast of the picture so you know where to cut.
On her picture, I used a black marker to color in the place that I wanted her to cut. Remember, you have to keep the smaller pieces around the eyes connected somehow to the outer edges.

With her zombie face, it worked out well as the black around her eye was able to connect to the edges. Wherever the darkest areas are, you don't carve there at all.
 Where the areas are fairly light, you scrape out lots of the meat on the inside of the pumpkin making the "wall" thinner so the light can show through. Where there are highlights, you scrape away the "shell" outer layer of the skin so that some of the light will show through.
It is so much easier to carve when you have the right tools. I keep an eye out at second hand stores as most of the time, even after Halloween, the tools or carving kits still tend to be more than I am willing to pay.
 Most of my patterns and kits come from second hand stores. Here is a link to the girls carving some cute Warner Brother patters that were in a magazine I purchased at a second hand store.
 Notice Princess Five is wearing her "overall" apron in both the pictures today and the carving from two years ago. Here is a link to how I made the overall aprons. You can search at the bottom of the page for the other parts on that if you are interested.
I find it easier to start cutting by poking a hole in the pumpkin using the poker. There are little saws that make small areas easier to cut.

If you do make a mistake and cut through an area you weren't supposed to cut, you can do surgery on that area by using a toothpick (the round ones are stronger and work better for this than the thinner flatter ones.
You just cut a piece of pumpkin that would fit the area you need attached and push the toothpick into the piece you want to add at an angle through into the pumpkin edge and you can also make a thin area stronger doing that as well to reinforce that area.
 We have had to do "surgery" every time we have carved a pumpkin at some point as when cutting, sometimes you will hit a "groove" or ridge and need a little more force to get through and then you end up cutting a bit too far so it isn't an issue as we all have done it.
I thought this photo of Princess Five taking a picture on her phone to text a friend was fun.
We have had to do "surgery" every time we have carved a pumpkin at some point as when cutting, sometimes you will hit a "groove" or ridge and need a little more force to get through and then you end up cutting a bit too far so it isn't an issue as we all have done it.
I thought this photo of Princess Five taking a picture on her phone to text a friend was fun.
 Anyway, you carve out the darker areas, and I show here with a knife how we used the serrated edge of the knife to scrape away the peel to make it just thinner than the normal pumpkin but we did scrape away more of the "meat" in those areas off the inside so that the light would show through better.
 By using the serrated knife, you can see clearly how it made it "look" like hair as the skin was carved thicker and thinner depending on where the serration of the knife hit the pumpkin.
You don't have to make it serrated but just a regular knife to scrape it if you don't want to fur or hair grain look.
By using the serrated knife, you can see clearly how it made it "look" like hair as the skin was carved thicker and thinner depending on where the serration of the knife hit the pumpkin.
You don't have to make it serrated but just a regular knife to scrape it if you don't want to fur or hair grain look.
 To make the longer "hair," I just used one of the poking tools but you could use the tip of a knife if needed.
You want to do an outline around the face to "frame" it as you can see in the picture from 2006 as well as this picture. Use your tool to dig in about half way.
If you go too deep, you will end up making the entire face fall off. Just scrape away the peel and about 1/6 of the "meat" of the pumpkin so that the light will show through highlighting the entire face.

If I didn't want the streaky highlighted look, I could have just used the serrated knife and "combed" down the entire way where the hair is on the picture but since she did have highlighted area in the picture, I wanted the streaks to show that.

You can see if you look closely at the pictures, where I used the knife and where I used the tool to scrape it down.
Make the depths varied all over so that it gives the pumpkin dimensions.

When carving, carve straight in so that there isn't an angle to the carving or the inside of the pumpkin can obscure the light. You can see how the hair jagged edges in the picture above are cut straight through and not at an angle.
 Once you have it carved, you can soak your pumpkin in some bleach water for a few minutes killing any bacteria you may have gotten in it from carving which would break it down more quickly.
After it has soaked inside and out, you can put some vinegar and some lemon juice mixed with water and spray the pumpkin inside and out so the acids will preserve it and keep bacteria from growing on it. (I used about 1 tsp in a cup of water.)
 If you do this a few days before Halloween and you want it to stay fresh for the big night, you can refrigerate it keeping it fresh for the Trick-or-Treaters.
It does need two or three tea-light candles in it for maximum light coming though so you can see clearly the pattern or picture.
Happy Carving!


