Blogger uses cookies. I CAN'T REPLY TO COMMENTS - Please Comment on my YouTube channel videos!
I am blessed. I believe these blessings come from sharing what I have with others & by giving gratitude for what I have. I also let God know my needs and wants. Any loving Father wants his children to have their needs and wants met. I believe God is my loving Father in Heaven, and I hope to use this blog to share the information I have with others in that we may both be blessed from it.
Welcome to my page! I had a friend suggest I start a blog as she thinks of me often when she reads other blogs. So, thanks to Sara, I hope we all enjoy this journey.
"And he who receiveth all things with thankfulness shall be made glorious; and the things of this earth shall be added unto him, even an hundred fold, yea, more." D & C 78:19
Princess Five had spring break. As you know if you read my blog, Princess Five and I love to do puzzles together. Over Christmas / New Years, she and I did three puzzles and some were SUPER hard. We really enjoy visiting and talking or watching an episode of something while working.
I found this 3D puzzle at a second hand store a few weeks back for $2. I thought it may be fun for us to do for spring break. She seemed excited when I told her I bought a new puzzle that seemed hard to do. The night before she arrived home, I set up the puzzle and worked on the outside of the puzzle on the edges. When I opened the box, there were some pieces in a cluster at the bottom right corner of the puzzle. The cluster looked normal so I stuck the other edges I was working on. I was super frustrated after an hour when I realized that the cluster was not done right and had to pull that apart to get the edges right. Every piece of this puzzle is one of two pieces. All the inside pieces of the puzzle are exactly the same. Every piece fits into ever hole and if there wasn't the three D effect, that would work but due to the sheen on the pieces, you can't tell if the piece belongs there or not. You can see by three of these pictures, that the same piece fits in all the holes and who knows if it belongs in the hole.... I didn't share my frustration with Princess Five. When she arrived home, I had been out running errands and she sat down and worked for an hour on the puzzle. I arrived home, and the first thing out of her mouth is "This puzzle is EVIL!" She was so upset she got up and told me she wasn't going to work on the puzzle anymore as she got one piece in an hour and it wasn't fun. She said she would much rather do another "marble" puzzle by far! Here is a post to our doing the marble puzzle. I sat down and worked on it just a bit and she sat down wanting to spend time with me and after ten minutes, she said she was done. She told me to throw it out. I was willing to work on it with someone but I don't have time in my life to do puzzles, especially when it is hard. I pulled the puzzle down and am getting rid of it. I don't want to deal with it not being fun so I purchased a few Japanese puzzles this week to do with Princess Four and Five when they are home from college and Mission.
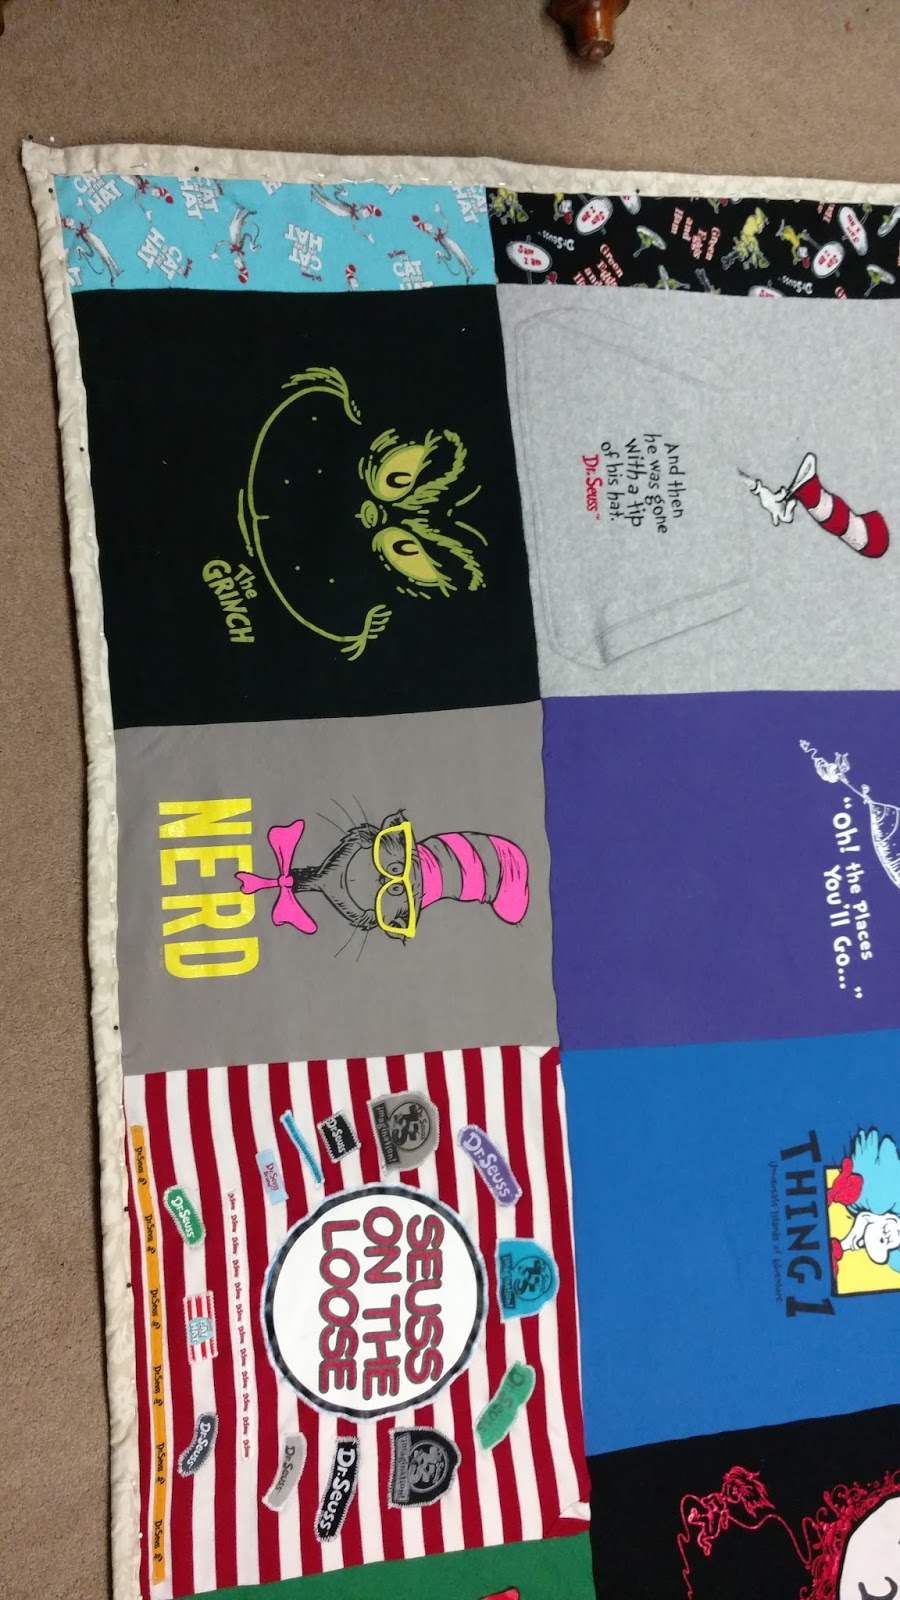
My second to last step on a quilt is tying the quilt with yarn or cotton crochet thread or to quilt it by machine or hand. I have always done my t-shirt quilt tied with the cotton crochet thread as I don't usually like the way the yarn looks on a quilt after a few washes and it has more bulky knots which can be uncomfortable.
I usually try and pick a color that is uniform throughout the quilt and matches the back but with this quilt, there was only one white square and most of the squares had some type of black color so in the end, I ended up using black crochet 100 cotton thread even though the backing was lighter.
I usually try to tie the squares in the least obvious spots as you will see in the pictures. I try to hit all the corners and then find a spot that matches the thread on the square and tie it there. I hope that you can see that in the pictures or video. I actually did it a bit different than I talked about in the video and normally do on this one as I used a really thin batting and was worried if I didn't tie it off more than I normally do on a thicker batting, that it would tear and lose loft. I almost wish now that I had just waited and bought a thicker batting but this also is an issue as the quilt gets larger and heavier and if used on a child's bed, it can hang down heavier on the edges putting weight on the child so I think it worked out alright in the end. Depending on how thick the batting is, is how close or far apart the ties need to be on the quilt. I did less on the bottom shorter row and more on the taller shirt rows. I think it came out super cute and have some supplies left to make a few pillow cases if she finds one or two more shirts she wants to use. Once the quilt is tied as I mention in the video, I sew the binding edge as if you sew it before your tie it, the batting can shift and twist so I suggest you watch all the videos 1-4 and look at the posts on "how to" do the steps. If you have any questions, feel free to ask. I am so excited for the big reveal. I asked if she wanted to wait until her birthday for the quilt but she said she would take it as an "Easter / Birthday" gift. ;-) I think she will love it! I do as it is one of a kind. Have a Blessed Day!
I am so excited to be nearing the finish of the Seuss quilt for Princess Two. This is the first time I have followed a quilt from start to finish. I usually just make one video of a project and share about how I do things but I figured that I may need to share the "process" of how I do things and think things through so I have a few videos to show how I do it. After getting all the rows sewed and then sewing the rows together, you put the backing / binding and fill into the quilt. I usually lay the sheet I am going to use down on the carpet after washing and drying it and if it is a wrinkly cotton, I sometimes will iron the sheet I am using for backing the quilt. When the back sheet or fabric is ready, place it Right side DOWN as this will be the bottom of the quilt. I have to say I have laid it down with the pretty side up and gotten the whole thing ready only to realize when I was folding it over to pin the back binding over on the front that I had done it wrong. It happens when I work tired. SO, make sure that the sheet is pretty side down!
Next, place the batting or fill on top of the wrong side of the sheet or backing and then place the quilt top on it right side up! Once you have it centered, have someone help you on opposite sides of the quilt to pull the backing tight, then the batting tight and then the quilt top tight so that when you start cutting and pinning, it won't have any wrinkles in it. Once you have everything nice and tight, cut the backing sheet 2 inches bigger than the quilt top. You can choose to either cut the batting to the top size of the quilt or you can leave it bigger and fold it over with the binding edge. I prefer to leave it just smaller than the back so that I can sew it into the binding which gives stability to the batting attaching it to the backing and front. I try and pin carefully without pulling as I don't want to move the top or bottom or have it be tighter on the top than the bottom which gives a twist to the quilt so just fold it over easily without pulling on anything. I pin the entire edge and try really hard to make all the sides even so that one edge isn't thin and the other side is wide.
Here is a hint when you are doing this; face the pins in the direction towards the back when you would be sewing the edge. It is super time consuming if you put the pins in backwards so you have to pull them out completely before sewing the strip, if you put them in the right direction, you can pull them out quickly and easily as you sew keeping the edging even. DON'T sew the edges or binding on until you have tied the quilt! I will share that tomorrow. Have a Blessed Day!
My Father and Step-Mom (distinction only as she is like a mother to me) helped me get a car a few months back. It is SO wonderful and I am SO grateful for it. I give gratitude for it each time I get in to go anywhere. Here is a post that I shared about it. When I got it, I didn't need the wipers but later, when it snowed, there was dust on the car just as there is in the pictures I took today. The snow leaves streaks and when the wind blows during the storms, it leaves a coating of dust as I live next to a dirt lot. My car usually ends up looking like this after every storm. When I needed the washer fluid, the one on the passenger side didn't squirt. I made mud with the one from the drivers side and I did notice when I was driving the car home for the first time, the cars coming at me on the other side of the highway would cause a weird streaking of the lights on my windshield. For the first few car fill ups at the gas station, I kept washing the windshield really well.
The car still had that streaked lights on the windshield so I got out some window cleaner and cleaned it again over and over hoping that whatever was causing the problem would clean off. It wasn't until that day when I needed to clean off the windshield that I realized that the glaring and streaking on the windshield I had was due to the washer fluid not working and the dirt had scratched find lines into the windshield which aren't all that noticeable when driving during the day but when lights hit it at different angles at night, it causes refraction so the light streaks. Once I realized what the problem was, I got under the hood and looked at the washer fluid tubing and it was hanging kinda loose and I could clearly see that there was glue in the tubing so it was obviously broken and someone tried to fix it without much luck. I contacted my mechanic and he said that he has glued them in the past but didn't know about buying and putting new ones in. I pondered if I could maybe glue a little straw to the inside of the tube that was damaged and see if I could get it to work better. I didn't think it would be a good fix and I am not one to fix things half way as I like to do things right so I thought I would continue my search. I contacted the junk yard asking about them or hoods for the car not knowing if / how I would need to replace them. The junk yard said they didn't have any and so I then went to a parts store and asked them if they knew what to do. One guy at a parts store said he heard you can buy them at the dealership and thought that a pair would be about $5 if he remembered right. He told me to contact the local dealership. I went to the dealership the next day as I was to head up to visit Princess One and didn't want to risk heading the five hours with no windshield wipers in case of a storm. They didn't have one but contacted a dealership in a town on my way to her home. I went to the wrong place at first as there were lots of dealerships in that area but finally found it. I ended up paying just over $20 for the one little plastic part. The works where I purchased it let me put it in and then ended up helping me but I am grateful he did as he had a little screwdriver that I needed to get the broken off end out of the rubber "t" that heads up to the sprayer nozzle. I just wanted to share this information with you as I had to search so hard to find one and obviously my mechanic and the junk yard men didn't know about buying the plastic parts. You can get generic ones online and put them in yourself and have matching ones. They cost so much at the dealership and they only had one anyway but they do look a bit different but not enough that I want to spend another $20 on a matching one as I am the only one who will probably notice. I am just grateful I have a working car and that I was able to fix that issue relatively inexpensively but wanted to share it in case any of you ever have a similar issue! Have a Blessed Day!
I have posted a few blogs over the years about my bunko group. I have also posted about how it is a great game for family reunions and camping etc as there isn't much involved in setting up a game.
The biggest issue for larger groups playing bunko is prizes but you could easily use small amounts of cash, a penny each win or something like that so that you didn't need to take prizes yet still make it competitive and fun for a larger group. I will put links at the bottom of this post to some of those ideas and events if you are looking to host bunko for a large group like a church activity or reunion as it forces people to interact with each other every few minutes as you change partners each round.
I like it for reunions as the people of similar ages tend to migrate towards each other but with this game, they are forced to interact with all ages yet in a fun and team effort way.
I started this, as I shared in another post, to make new friends and to get to know some people in my church and neighborhood better. I had just moved across the country and moved to an area when I didn't have family near so I felt a bit lost. I figured there had to be a few other people who were feeling in a similar way and found that most of the women I invited into the group had moved to the area within the past few years and welcomed a group of women in the same stage of life!
To start a bunko or Bunco group, you basically need a bag or box with a few items. Most are probably things you have already. Usually a Bunko Club or Group has 12 women in it. It works that you have three different groups playing at the same time in three groups of four.
Each person has a partner for that round. You sit alternating you, your opponent player one, your partner, and opponent player 2 and then you again. So that every you and your partner are scoring points together. You score you and your partners points. The partners that make it to 21 points first in the room calls the game "over" and the team on each table that has the most points, is the winning team.
In our group, we don't have a head table that has to get to 21 points for the room. We have it that the first team to 21 points or rolling a bunko wins that round. The "round" is rolling for different numbers each round. First round is rolling for ones. As long as you roll a one on that round, your turn continues until you don't roll a one anymore. The next person on the table then starts to roll for ones until they don't get any and then the play passes to your team member and they continue rolling the dice until they don't roll any ones and so on. If you are on ones and roll all three dice as ones, that is a bunko. If you are on "ones" and you roll three of the same number on the dice at the same time and they aren't ones, it is called an "extra" and is worth five points and you keep a tally of the times you roll extra's as there is a prize for the person who rolls the most of those in the night.
After someone in the room either rolls a bunko on ones or reaches 21 ones rolled on the team, the game ends in the room and the two winners move to the next table and the losers now stay on that table but are no longer partners for the next round. This makes sure you are continually having a new fresh partner to roll with. The winners mark a "W" on that round an the Losers mark a "L" on that round and then you are now rolling for the number 2 for this round. When a team in the room either rolls all three twos on the dice calling "bunko" or a team reaches 21 twos rolled, the round ends and the winners move and the losers swap partners with the winners coming to the table from the other group so you now have a new partner and are rolling for the number "3" for this round.
The game is simple and even little children can catch on quickly. If you win the round by rolling a Bunko, you write "WB" on the win section as there is a prize for whoever rolls the most bunkos in a game so you want to keep track of that as well.
Basically, our group hosts with no cost. We used to have everyone bring $5 each month but in the end, if you host one month a year and buy the prizes out of your own money, it ends up being the same amount a year. This is a much easier way not having anyone pay as in the past we had a few members who didn't come often and would forget to pay the hostess and this way removed any issues with that.
Each member picks a month to host and for that night, provides a meal, treats on the table and the prizes. The bunko box heads home with the person who is hosting it the next month. Prizes are supposed to add up to $60 which is $5 a person. However, in our group, only six people win bigger prizes and most of us pick a $1 gift for the six loser women so everyone goes home with something. The biggest prize is the "Bunko" prize for whoever has the most bunkos for the night. The next prize is for most wins, then second most wins, then there is a prize for whoever has the most "extra's" which is rolling three of a number in a round other than the number you are rolling for that round. The next prize is for "evens." Whoever has the same number of wins and loses or closest to the same number get the "evens" prize and then the person who has the most losses gets the "Loser" prize.
We used to have set prizes for each depending on how much we spent on the prizes but found that sometimes the person who won Bunkos didn't want the most expensive prize so we let people pick which prize they would want in order of the prizes won.
To set up the "Bunko Box" you need: at least 12 pens for people to score, scratch paper to keep scores on, 9 dice which you can usually find at the dollar store for cheap, copies of the bunko score sheet so each person has a way to tally wins and loses for the night and we keep a Sharpie in the box as we write our names on solo cups for the night so we know whose drink is where as we have all walked away leaving our drink on a table.
The hostess cooks a meal, a dessert and puts out candy on the tables for snacking as we play and then purchases the prizes. We have been doing this for so many years we have seen it all in the prize department. Some get gift cards to local businesses, some make the prizes and others buy them online, or in boutiques etc. However, even if someone didn't have prizes at this point, I think we just enjoy getting together and catching up on life. We have LOVED having these friendships over the years. It is wonderful that 8 of the original 12 women I started the group with are still in the group.
I have heard of other groups not getting along or back biting but our group is unique and we truly love each other. Most of the women leaving have been people moving out of the town and we really miss those that have moved. I keep thinking I want to do a reunion night where we have all the old friends back with their families but it seems that our lives are a bit busy to get that together as I did try last year.
I know of other groups that do a potluck each month, just do desserts and play the game instead of a meal, put money in a pot and don't buy prizes etc. The options are endless as you need to gear your group to what fits your needs. This works for our group and we love having a night out once a month. We have ours on the last Thursday night of the month as weekends ran into scheduling issues and that has been "our" night for 22 years or so.
If you have any questions on things, feel free to ask. I think everyone needs a group of friends like this as we have been through so much together.
Hopefully this is clear enough to understand. Here are the links to the posts on different bunko ideas.
I have been in a bunko group for the past 22 years or so. I started it as I was new in town and with small children and not knowing many people, I thought a night out once a month would be a good idea. There were also several other women who had moved to the town around the same time we did, I figured they also could use friends. I purchased all the stuff needed for the group which really isn't much. Each year on my month to host, I pull the dice out of the box and fill in any of the dots which have chipped through the year. I used to purchase new dice every year but a few years back, I thought I would get out my black sharpie and see if I could use it to fill in the chips on the dice. It worked great. The thing I really like is that even if you overdo it at some point, you can quickly wipe the top off with your finger and the black will wipe off but the dots are then black and you can easily see the dots and it usually lasts the year until the next "spruce up." Thought I would share this little trick with you since I didn't figure it out for a few years. You can see how many dice I purchased through the years on this blog post about my bunko group here.
I can't tell you how many times that has happed to me. I think I have posted something and then I need to reference it and can't find it or the girls or other family will call asking for a recipe or dates on an activity and I tell them to search for it on the blog and they tell me they searched and searched and couldn't find it and then I go looking only to find that I never actually posted the pictures and or video. Such is the busy life of a single mom.
For the past winter, I have been wearing these horrible synthetic fake slippers as my wool slippers shown below got a long rip in them that I had repaired in the past and they tore again and they are so worn, I just couldn't wear them until I tried to mend them again and just never got around to it. I think they were on clearance or something so I just wore the synthetic ones thinking I would get to mending the others.
Last year, for much of the time, I wore my 35 year old ugg boots shown with the tears in them. If I was headed out to get mail or do something in the yard, I would pull them on and wear them when my feet were cold but I HATE wearing things on my feet and only wear them if I have to wear them so I like something I can easily slip on and not have to bend over. The Uggs always need a tug to get them on so I think in my laziness and health issues being so large now, I just liked having something handy I could slip on and off without much effort.
There are several problems with the synthetic slippers. They cause static so every time I would go to turn on the lights, I would get a shock. I don't like getting shocked so would jump each time and have become jumpy when turning on the lights. lol Also, they don't keep your feet as warm or stay warm like wool does. They don't have a "loft" to them as they get matted in the first few days and then there isn't any cushion on the bottom. Another issue is that the static collects hair and I keep finding hair balls on them or they leave "fur balls" of hair in the house if they come off while I am walking.
And lastly, they don't stay on my feet due to not having a back like my wool NZ slippers so my feet drag when I am wearing them as the backs fall and slide on the ground more like a shuffle than a walk and I have to use my foot muscles to keep them on. This isn't a big deal unless you are walking up the stairs and they happen to start sliding off and you drop your foot just a bit to hold it on and miss the stair and end up kicking the stair just below the top and then falling forward with things in your arms so you can't catch yourself.....
Yes, that is a true story that happened to me last week as I was carrying laundry up the stairs, I was losing the slipper and fell forward on the stairs SO grateful that I didn't fall while walking as both my shoulders have been damaged due to that in the past. I wasn't harmed, but it terrified me that I may actually fall wearing the slippers. So, due to those issues, I said a little prayer that I could find some wool slippers to wear in the house that 1. had a sole I could wear outside. 2. Were easy to slip on and off while standing. 3. Have a back so that they won't fall off and cause me to fall or have an injury of any kind. 4. Were new. 5. Were inexpensive as I know they are near $100 and I don't want to spend that currently on something I'll only wear for the next month or so while the weather isn't sure if it is spring or winter. And 6. Were all wool! I wanted to know that they would keep my feet warm, I could wash them, not have static and synthetic footwear of any kind eventually smell.
With that little prayer last week, I didn't worry about it. My Heavenly Father is SO good to get me the things of my heart and I usually just say a prayer giving thanks for what I am blessed with and then letting him know the situation and why I would like or need the thing I am asking for and then I just trust in Him that He will take care of it in His own time. If I think about it again, I say another little prayer giving thanks for the things I do have and then let Him know, I am still desiring that "thing" that would make my life easier in some way. As a parent, when one of my children thanks me for something and then asks for help with something, I can't resist doing everything in my power to get that item for them asap!
In true form, it didn't take a week before God answered my prayer. I went into a second hand store and wouldn't you know it that they had a new pair of sheepskin wool slippers with a rubber sole that slip on and off, have a back, fit my feet and were $4!
I LOVE that my Father in Heaven takes such care of me. I immediately gave a prayer of thanks for the wonderful new gift! They had a synthetic boot that has leather outside but fake wool inside that were new also and were $5! I laughed that the fake ones were more than the real ones. I actually bought both pair, but have to share that the black boot with the fake insides are NOT keeping my feet warm. I thought that maybe with the leather outside, they would work as more of a work type slipper I could wear outside and not worry about ruining and then wear the real ones for when people come visit or when I am not working on projects. The fake ones have NO support or loft in the base and it feels like I am barefoot and my feet are freezing. It is weird that it feels like they are taking heat away from my feet rather than keeping what heat I have inside the slipper. Maybe they are making my feet sweat and that is chilling them.
It looks like I will be wearing the wool slippers all the time to work and go outside as well as in the house. I LOVE that they have a removable foot insert that is washable however and they also have some padding under the loft so that they are more comfortable to wear anyway. I also LOVE that they are called "Old Friend" making me think God and I am "old friends." The slippers are available online and the cheapest I could find a pair was $70 plus shipping.
Just for fun, I looked up the black boot pair I also purchased for a dollar more than the real slippers and they are $40 online. I can't imagine that they would put the effort and cash into making them with real leather outsides only to skimp on the inside.... It seems like such a waste of leather to me. I feel sad for the animal that gave up its life to be wasted in that way. I believe that animal is for the use of man but not to be wasted. Twice in my life I have been vegetarian but both times I have been so protein and iron deficient that I ended up going back to eating meat but do eat it sparingly. However, there is nothing like the natural fibers for comfort and breathability to me. This may sound silly, but I give gratitude to the animals for sharing their feathers, wool, or leather with me regularly. Similarly, I give gratitude to the trees that share their beauty in furniture. Many times, I have given gratitude to the artisan who created beautiful pieces of furniture or artists who create masterpieces or even composers of music for music I enjoy. Just a little prayer of gratitude for them using their talents to bless my life.
I don't know if anyone else gives gratitude like that but I do give little prayers of gratitude when I experience something that moves me and also usually give gratitude for my eyes or ears in that prayer of gratitude as well. I know that the Native American cultures give gratitude to the earth and animals so perhaps it is something similar there. I guess it may seem weird but I also sometimes wonder what trials a tree or animal went through to give it certain grain patterns in the wood or leather. Was there a storm, a drought, a flood etc that caused it to get a knot in a certain spot causing that impression in the wood. It is a weird thought, but I am the first to admit I am weird.
Anyway, I don't know how I got on that tangent but just wanted to share with you how grateful I am that my Father in Heaven shared that wonderful blessing with me this week and answered my prayer so quickly!
I have already thrown out the synthetic static making slippers and am pondering on spinning the wool from my beautiful fuzzy New Zealand sippers into some wool on the spinning wheel I purchased while in New Zealand. The slippers were a gift from my hosts in New Zealand and they have so many memories for our family as the kids wore them to pajama day at school and I wore them most of their lives so I think maybe I will "sheer" them with some scissors and card the wool and spin it into some wool to use for a project or something. Princess One has a spinning wheel and a weaving loom and is becoming quite the artist "felting" wool so perhaps she could come up with a use for the wool on these heirloom slippers.....
I want to thank my New Zealand families who gave me such a love of all things wool and shared their wonderful country with me. I consider myself an adopted Kiwi and will always feel blessed to have experienced that country in all its beauty at such a young age. I also wanted to warn you not to spend the money on the "Lamo" fake wool slippers. Spend the extra $30 and get the real thing for comfort, cleanability and warmth! I laughed as they slippers were kinda "Lame - O" ;-)
I made a video on how I wash the wool Ugg boots and other wool footwear. I know people say you should hand wash them but I can't get them rinsed well from the soaps and you can't "wring" them out so they have tons of water and take forever to dry so I just use the washer on hand wash setting and have always been happy with that. I have never had a pair rip or get damaged in any way using this method and have done it for 30 years.


 Over Christmas / New Years, she and I did three puzzles and some were SUPER hard. We really enjoy visiting and talking or watching an episode of something while working.
  The night before she arrived home, I set up the puzzle and worked on the outside of the puzzle on the edges. When I opened the box, there were some pieces in a cluster at the bottom right corner of the puzzle. The cluster looked normal so I stuck the other edges I was working on.
 I was super frustrated after an hour when I realized that the cluster was not done right and had to pull that apart to get the edges right.
 When she arrived home, I had been out running errands and she sat down and worked for an hour on the puzzle. I arrived home, and the first thing out of her mouth is "This puzzle is EVIL!"
  She was so upset she got up and told me she wasn't going to work on the puzzle anymore as she got one piece in an hour and it wasn't fun. She said she would much rather do another "marble" puzzle by far! Here is a post to our doing the marble puzzle.
  I sat down and worked on it just a bit and she sat down wanting to spend time with me and after ten minutes, she said she was done. She told me to throw it out. I was willing to work on it with someone but I don't have time in my life to do puzzles, especially when it is hard.
  I pulled the puzzle down and am getting rid of it. I don't want to deal with it not being fun so I purchased a few Japanese puzzles this week to do with Princess Four and Five when they are home from college and Mission.


