


I figured I would try it the next year and here are some we did in 2006. You can see Princess Four and Five here on pumpkins and I know we have done all the girls at some point but I don't think the pictures were digital and I haven't scanned all their photos in or put them in albums so I am not going to find those anytime soon with all I have going on so I was just happy to scan and find these cute pics of them so young and cute.

You can tell it is them on the pumpkins and if I showed you the pictures we used, they actually are very close to the pictures as Princess Five had pony tails in her picture.
Anyway, I thought I would share with you how you can make any picture into a pumpkin or any melon for that matter. It would be cute to do with a watermelon for a baby shower or something also.
 You take a photo you like. It can't be a small picture with lots of detail or it won't work as you have to leave connections to the outside of the picture in dark colors so things like the eyes will still be attached so a picture with contrast is great.
  Princess Five was a Zombie this weekend for a charity fun run where they had Zombies walking around scaring the runners. Personally, I can't think of a more terrible place to scare someone than when they are already running on a nature trail in the hills but I guess there are those that thought it would be a good idea so she and her friend volunteered.
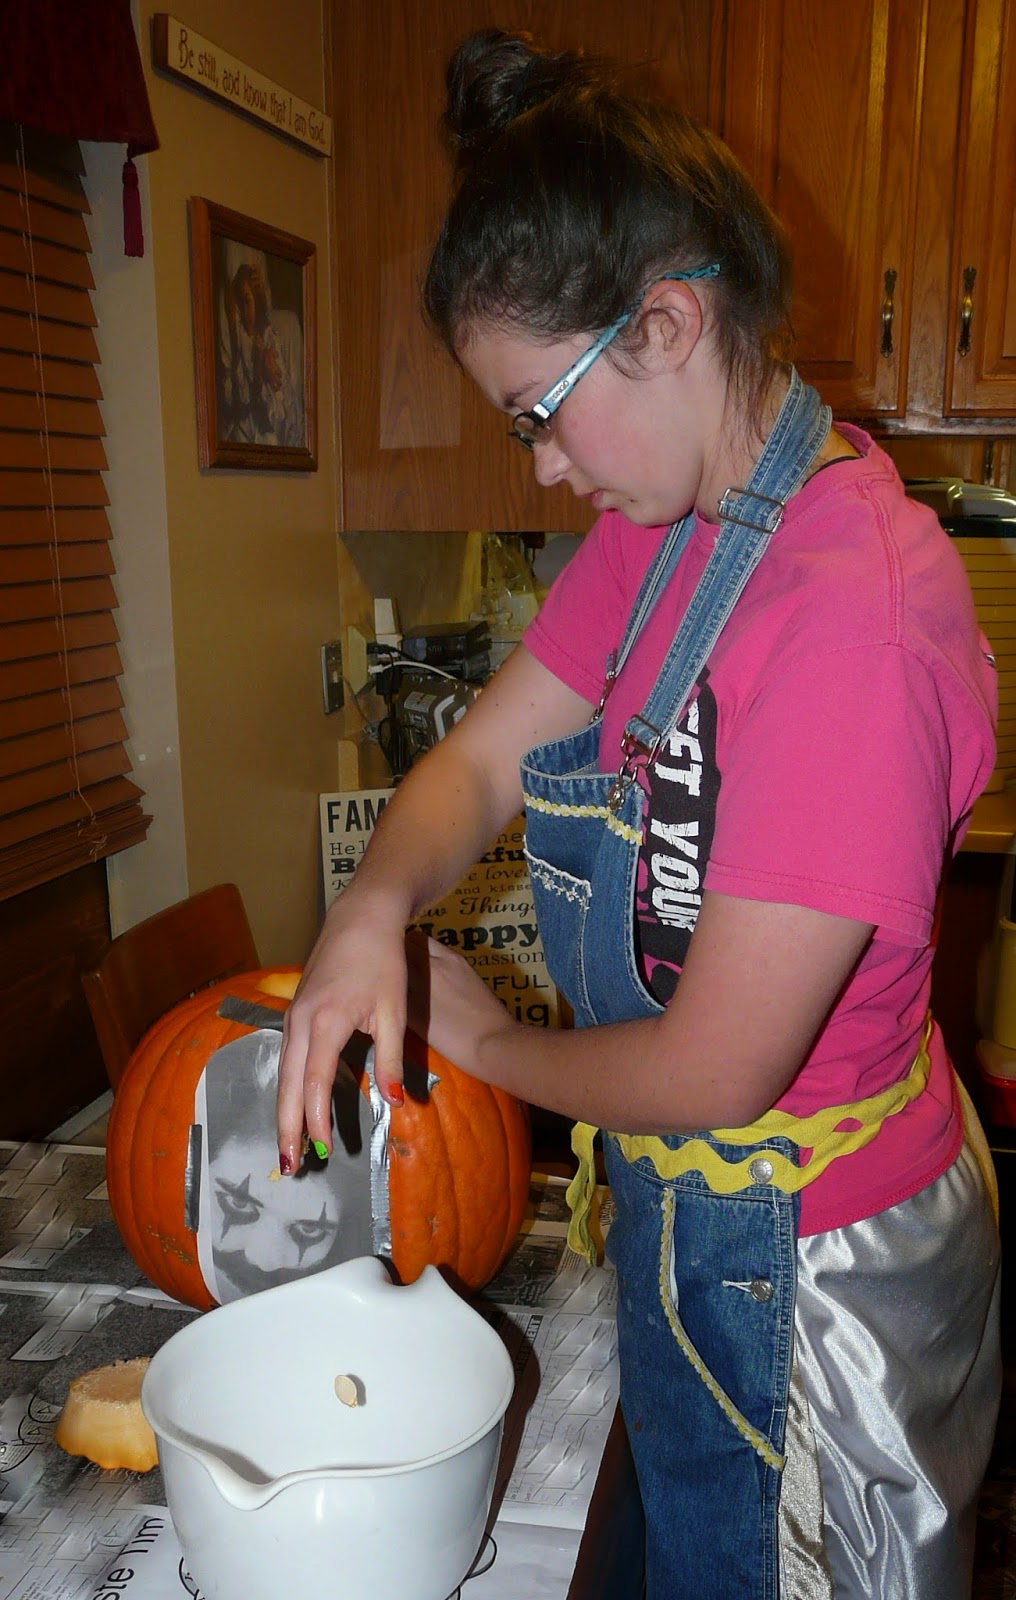
They took some cute pictures and she thought that carving her scary zombie face on a pumpkin for Halloween would be fun. We grew a few pumpkins this year and one was flat on one side which is PERFECT for carving these as you tape the picture onto the pumpkin for carving.
If you want to make it easier, pick one that does have a flatter side, it just makes it easier to carve.

Once you have chosen a picture, you want it to be about an 8x10 size or if you have a smaller pumpkin, 5x7 is good. What you do is photo copy or print the picture in black and white. You want to see the light vs dark contrast of the picture so you know where to cut.
On her picture, I used a black marker to color in the place that I wanted her to cut. Remember, you have to keep the smaller pieces around the eyes connected somehow to the outer edges.

With her zombie face, it worked out well as the black around her eye was able to connect to the edges. Wherever the darkest areas are, you don't carve there at all.
 Where the areas are fairly light, you scrape out lots of the meat on the inside of the pumpkin making the "wall" thinner so the light can show through. Where there are highlights, you scrape away the "shell" outer layer of the skin so that some of the light will show through.
 It is so much easier to carve when you have the right tools. I keep an eye out at second hand stores as most of the time, even after Halloween, the tools or carving kits still tend to be more than I am willing to pay.

Most of my patterns and kits come from second hand stores. Here is a link to the girls carving some cute Warner Brother patters that were in a magazine I purchased at a second hand store.
 Notice Princess Five is wearing her "overall" apron in both the pictures today and the carving from two years ago. Here is a link to how I made the overall aprons. You can search at the bottom of the page for the other parts on that if you are interested.
 I find it easier to start cutting by poking a hole in the pumpkin using the poker. There are little saws that make small areas easier to cut.

If you do make a mistake and cut through an area you weren't supposed to cut, you can do surgery on that area by using a toothpick (the round ones are stronger and work better for this than the thinner flatter ones.
You just cut a piece of pumpkin that would fit the area you need attached and push the toothpick into the piece you want to add at an angle through into the pumpkin edge and you can also make a thin area stronger doing that as well to reinforce that area.
We have had to do "surgery" every time we have carved a pumpkin at some point as when cutting, sometimes you will hit a "groove" or ridge and need a little more force to get through and then you end up cutting a bit too far so it isn't an issue as we all have done it.
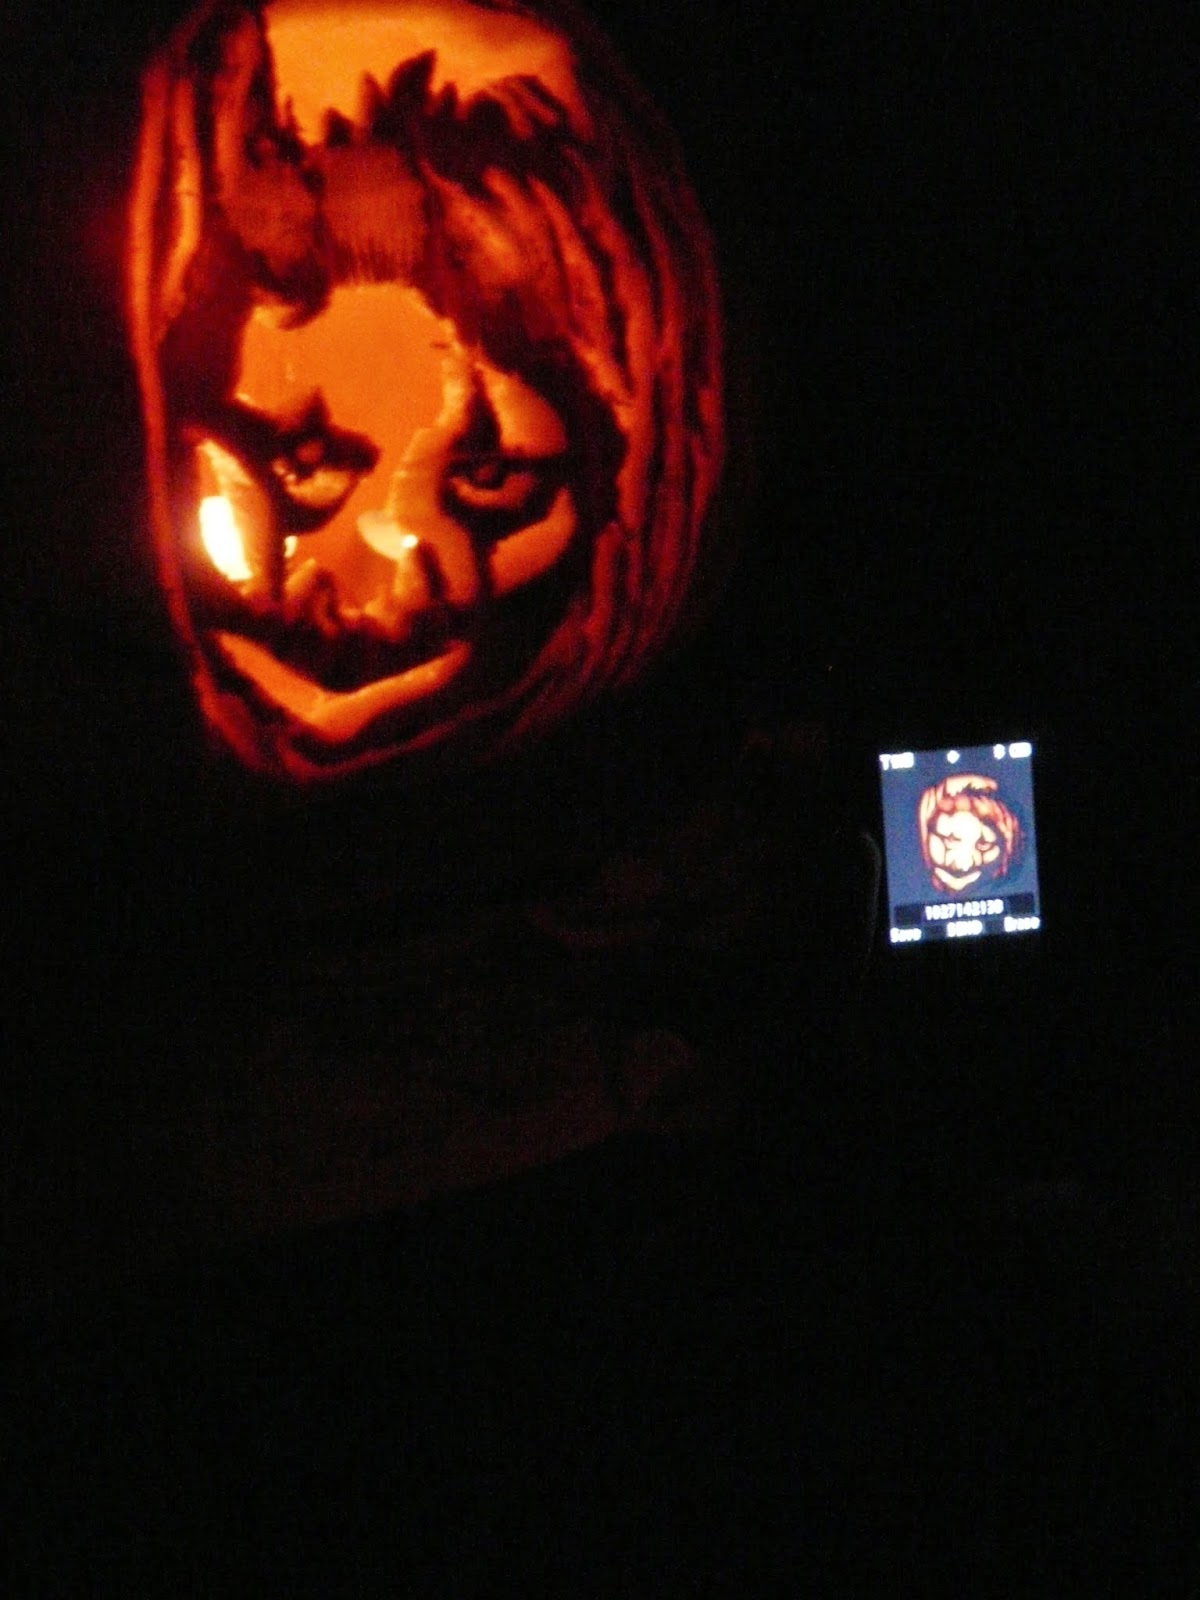
I thought this photo of Princess Five taking a picture on her phone to text a friend was fun.

Anyway, you carve out the darker areas, and I show here with a knife how we used the serrated edge of the knife to scrape away the peel to make it just thinner than the normal pumpkin but we did scrape away more of the "meat" in those areas off the inside so that the light would show through better.

By using the serrated knife, you can see clearly how it made it "look" like hair as the skin was carved thicker and thinner depending on where the serration of the knife hit the pumpkin.
You don't have to make it serrated but just a regular knife to scrape it if you don't want to fur or hair grain look.
 To make the longer "hair," I just used one of the poking tools but you could use the tip of a knife if needed.
 You want to do an outline around the face to "frame" it as you can see in the picture from 2006 as well as this picture. Use your tool to dig in about half way.
If you go too deep, you will end up making the entire face fall off. Just scrape away the peel and about 1/6 of the "meat" of the pumpkin so that the light will show through highlighting the entire face.

If I didn't want the streaky highlighted look, I could have just used the serrated knife and "combed" down the entire way where the hair is on the picture but since she did have highlighted area in the picture, I wanted the streaks to show that.

You can see if you look closely at the pictures, where I used the knife and where I used the tool to scrape it down.
Make the depths varied all over so that it gives the pumpkin dimensions.

When carving, carve straight in so that there isn't an angle to the carving or the inside of the pumpkin can obscure the light. You can see how the hair jagged edges in the picture above are cut straight through and not at an angle.
 Once you have it carved, you can soak your pumpkin in some bleach water for a few minutes killing any bacteria you may have gotten in it from carving which would break it down more quickly.
 After it has soaked inside and out, you can put some vinegar and some lemon juice mixed with water and spray the pumpkin inside and out so the acids will preserve it and keep bacteria from growing on it. (I used about 1 tsp in a cup of water.)
 If you do this a few days before Halloween and you want it to stay fresh for the big night, you can refrigerate it keeping it fresh for the Trick-or-Treaters.
It does need two or three tea-light candles in it for maximum light coming though so you can see clearly the pattern or picture.
Happy Carving!
No comments:
Post a Comment